Care and attention to detail are critical whenever installing custom wheels—especially alloy wheels. Taking the time to prep threads, verify parts, and torque correctly helps prevent damage, vibration, and customer complaints.
Inspect threads first. Check studs/bolts and lug nuts for clean, undamaged threads. Replace any lug nut with burrs or flat spots. Finger-start every lug nut—if it won’t thread easily, stop and verify size and pitch before proceeding.
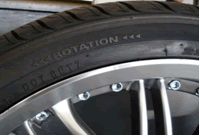
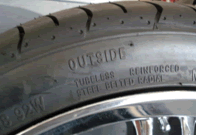
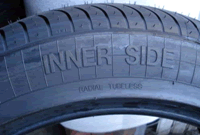
Directional & asymmetrical tires. Confirm rotation arrows or “outside/inside” markings on the sidewall before mounting. Examples of manufacturer indicators:


Test-fit new wheels before mounting tires. Make sure the hub face is clean (remove OE stud clips or debris). Fit the wheel and snug at least three lugs—no need for full torque—then check brake caliper and suspension clearance.


Lug-centric vs. hub-centric. Some wheels center via the lugs; others via the hub bore. If the wheel’s center hole is larger than the vehicle hub, install hub-centric rings to center the wheel. If rings were not included and are required, contact us and we’ll supply the correct size (note: rings are not available for some older vehicles).
Wheel fasteners are designed to stretch slightly at specification, creating proper clamp load. Under-torque can loosen; over-torque can stretch or break studs and mar finishes. Use a calibrated torque wrench—never an impact gun—to reach spec accurately.
Tooling matters. Use thin-wall sockets that fit the wheel’s lug bores without scraping. Keep sockets clean to protect finishes. Perform all torque work with the tire off the ground so mating faces fully seat without tire sidewall resistance.
Anti-seize tip. Apply a thin coat of anti-seize to the hub face (not threads) to prevent future sticking between aluminum wheels and steel hubs.
Re-torque all lug nuts after the first 50–100 miles, especially on new alloy wheels. Raise the vehicle, loosen in a star pattern, then re-tighten in sequence to full spec.
Always tighten in a cross/star pattern to distribute clamp load evenly and avoid hub/rotor warpage. Tighten in two steps (e.g., 25% of spec, then 100%).
Always follow the vehicle or wheel manufacturer’s torque specifications.
Before installation, verify bolt pattern, hub bore, and seat type for proper hardware. If changing sizes, keep overall diameter close to stock and confirm specs with: Wheel Bolt Patterns Guide, Plus/Minus Sizing Calculator, Tire Size Comparison, and Wheel & Tire Size Calculator.
Confirm inner/outer clearance and brake caliper room with your chosen width/offset. Review Wheel Offset Explained and Custom Wheel Backspacing. For hub-centric fit basics, see Custom Wheel Hub Bore. Preview stance with our Wheel Visualizer.
Match or exceed OE load index and speed rating. Start with Load Index Chart and Load & Speed Ratings. If TPMS is present, review TPMS Service before swapping wheels.
Want the easy route? Choose a Wheel & Tire Package—we mount, balance, and include the correct lug kit and hub rings if required. Unique brakes or offsets? Use our Custom Built Wheel Order for engineered clearances.
Have questions about torque, rings, or hardware? Contact Us. Ready to browse? Shop Wheels and Shop Tires.
Reviewed by the Performance Plus Tire Fitment Team.